
Saturday, February 28, 2009
I promise I didn't disappear...
I was just really really really insanely busy this week. Last weekend I worked on samples for my wedding invitations (I think we are going with version 2, I'll be sure to post photos soon). This week was a bit crazy with school, I joined the gym and started working out again, and I had tons of orders to get out. I hope to be back on schedule with more posts tomorrow, I hope... but after a day in Cincinnati at some of my favorite shops, I need to get some sleep!

Giveaway Winner!
And the winner of a custom wall monogram is...
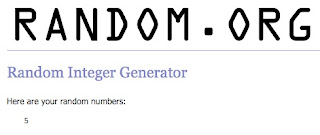 Cora Anne!! Congrats! I'll be getting in touch to get your address and confirm your choices!
 Cora Anne!! Congrats! I'll be getting in touch to get your address and confirm your choices!
Saturday, February 21, 2009
Collecting: Brooches
I'm a fairly plain-jane dresser, and I'm thinking I need to add some fun brooches to my wardrobe to brighten things up. Here are come I'd love to collect:
 Gorgeous! A little piece of 3-D art.
Wool felt flower and pearl brooch/pin in winter blue and white by Minmade
 Okay, so it's a hair clip, not a brooch -- but I wish it was!
Robin's Egg Blue Monogram Baby Hair Clip by Details Studio
 I love how this looks like a ribbon you would win at the fair.
Red and Pink Poppy Brooch Ribbon for a Special Valentine by Poppy and Clover
 I come back to this brooch again and again, I just adore it!
Come Fly With Me - Fabric Brooch by Rubyjo
 Gorgeous! A little piece of 3-D art.
Wool felt flower and pearl brooch/pin in winter blue and white by Minmade

 Okay, so it's a hair clip, not a brooch -- but I wish it was!
Robin's Egg Blue Monogram Baby Hair Clip by Details Studio
 I love how this looks like a ribbon you would win at the fair.
Red and Pink Poppy Brooch Ribbon for a Special Valentine by Poppy and Clover
I come back to this brooch again and again, I just adore it!Come Fly With Me - Fabric Brooch by Rubyjo
Thursday, February 19, 2009
Organizing: Jewelry
I have too much jewelry to fit in your standard sized jewelry box. I also find that I wear my jewelry more if it is in view and easily accessible.
 I store bracelets, necklaces with thin chains, and earrings in small white ceramic bowls. I actually have these bowls in a shallow drawer in my vanity most of the time, but I put them in this fabric tray to show how you could display them on top of a dresser. I group the items together by color or style -- this makes it easier to grab pieces that work well together when I am getting ready in the morning.
 For bulkier necklaces, I use this tree from Ikea for display and storage. It is usually out on my vanity counter top. When the necklaces are in view all the time, I am more likely to wear them!
 And now for some quick Etsy-love! This merry-go-round necklace is from Make Pie Not War. The gold earrings in the back are from the pebble collection. The bracelet is vintage -- I love the chipping on the enameled leaves, I think it gives it charm!
 More Etsy-love! The feather earrings are my own design. The dime necklace is from sudlow. The patina wing is from Miss Fickle Media. The key is a vintage find!
 I store bracelets, necklaces with thin chains, and earrings in small white ceramic bowls. I actually have these bowls in a shallow drawer in my vanity most of the time, but I put them in this fabric tray to show how you could display them on top of a dresser. I group the items together by color or style -- this makes it easier to grab pieces that work well together when I am getting ready in the morning.
 For bulkier necklaces, I use this tree from Ikea for display and storage. It is usually out on my vanity counter top. When the necklaces are in view all the time, I am more likely to wear them!
 And now for some quick Etsy-love! This merry-go-round necklace is from Make Pie Not War. The gold earrings in the back are from the pebble collection. The bracelet is vintage -- I love the chipping on the enameled leaves, I think it gives it charm!
 More Etsy-love! The feather earrings are my own design. The dime necklace is from sudlow. The patina wing is from Miss Fickle Media. The key is a vintage find!
Wednesday, February 18, 2009
Inspiration Wednesday: Rain
Today it is rainy outside and I love it! Here are some rain-inspired finds:
 I love the combination of enamel and clear glass in this necklace.
Rain Cloud Necklace by Dough Lady Designs
 Sweet cloud and raindrop mobile -- I adore the use of the grey wool with the scrap fabrics.
Rain Clouds - cloud number 22 by IgFrog
 Don't you wish you could float above the clouds too?
Over the rainy clouds -print by Carambatack Designs
I love the combination of enamel and clear glass in this necklace.Rain Cloud Necklace by Dough Lady Designs
Sweet cloud and raindrop mobile -- I adore the use of the grey wool with the scrap fabrics.Rain Clouds - cloud number 22 by IgFrog


 Don't you wish you could float above the clouds too?
Over the rainy clouds -print by Carambatack Designs

Tuesday, February 17, 2009
Tool Tuesday: Candle Lighter
 I know what you are thinking. "Jamieson, that is NOT a crafting tool. That is a candle lighter." (A Bic Luminere Candle Lighter, to be exact.)
I'm going to have to disagree with you though. It is most certainly a craft tool, at least in my craft studio. I should begin by mentioning my extreme fear of matches. I can't light them. Never could. I've tried, both the book and box kind -- I am just no good at lighting matches. Which is probably because I think that you should never have a flame that close to your hand. I mean, seriously, who thought that a teeny tiny less-than-two-inch match was a good idea?
Which brings me to another fear. I am not really a fan of fire. I was a girl scout, for many years in fact. However, I never came to love the whole campfire thing. Just not my cup of tea.
That being said, this candle lighter is one of my favorite tools. Partly because it keeps the flame far, far away from my fingers.
But the main reason I love this candle lighter is because I looooooove ribbon. Its a mild obsession. Please see exhibits A, B, and C below for further proof.
 Exhibit A: Ribbon organized on Ribbon Ring Tags. I found these nifty organizers after reading LollyChop's review on her blog. The ribbons are organized by color, of course. At the top you can also see my embroidery floss organized by color on rings.
 Exhibit B: More ribbon on white plastic ribbon cards. All of my ribbon used to be on these cards... until I ran out of room and decided to use the ribbon ring tags. Now, I only store plain ribbon or ribbon that I have yards and yards of on these cards. They are organized by color in glass jars on a floating shelf. And clearly, I have a lot of buttons as well.
 Exhibit C: The stash of unorganized ribbon in my closet in a box. This ribbon is just begging to be organized, which would be possible if I wasn't out of ribbon ring tags! Some of the plain stuff will going on the ribbon cards too.
So, there you have it. I clearly have a lot of ribbon. Polka dot, striped, gingham, grograin, floral, velvet, mmm... I love it all!!
The thing only thing I dislike about ribbon... is when the ends fray. *Cringe* It is horrible! You start out making this lovely 45 degree cut, or even a fancy V-cut in the end of a wider ribbon... and then the end starts to fray, ruining the whole thing. You can cut the end again, but inevitably it will start fraying again. *Sigh* What's a ribbon-obsessed crafter to do?!?!
This is where the candle lighter comes in. You can use the heat from the flame to seal/melt the end of the ribbon. Most of the ribbon I have works for this nifty trick. Ribbon that is all cotton or another natural material will not work (at least it doesn't work for me) -- so, most of my ribbon is synthetic stuff I guess!
Before we proceed... WARNING: Please read all warnings on the candle lighter you use before you try this nifty trick. Don't allow children to use the lighter and follow any other directions that come with your lighter. Thank you!!!
The thing only thing I dislike about ribbon... is when the ends fray. *Cringe* It is horrible! You start out making this lovely 45 degree cut, or even a fancy V-cut in the end of a wider ribbon... and then the end starts to fray, ruining the whole thing. You can cut the end again, but inevitably it will start fraying again. *Sigh* What's a ribbon-obsessed crafter to do?!?!
This is where the candle lighter comes in. You can use the heat from the flame to seal/melt the end of the ribbon. Most of the ribbon I have works for this nifty trick. Ribbon that is all cotton or another natural material will not work (at least it doesn't work for me) -- so, most of my ribbon is synthetic stuff I guess!
Before we proceed... WARNING: Please read all warnings on the candle lighter you use before you try this nifty trick. Don't allow children to use the lighter and follow any other directions that come with your lighter. Thank you!!!

Hold your ribbon in one hand, with your fingers well away from the end (at least two to three inches. Light the lighter by pulling the trigger/button. Slowly bring the lighter closer to the end of the ribbon. I find that I have more control if I move the lighter, rather than the ribbon.
 Bring the lighter near the end of the ribbon, but DO NOT touch the ribbon with the flame. We are trying to melt the end of the ribbon, not set the ribbon on fire!! It will only take a fraction of a second to melt the end of the ribbon, so please watch closely. Once you see it start to melt, move the flame away and release the trigger to turn off the flame. If you hold the flame near the ribbon end too long, it will singe/scorch and turn black. If you aren't happy with the results, cut off the melted end of the ribbon and try again.
 Here is the sealed/melted end of the ribbon. Nifty, huh? And much better than messing around with that sticky ribbon sealer gluey-gooey stuff that you find a in a bottle, at least in my opinion. I've never had much luck with it. (By the way: The ducky pin snuck in the picture -- He was so proud of himself for holding the ribbon steady while I took the lighter photos! And, just for future reference, I do not recommend trying to photograph and use a lighter at the same time. Just not a good idea, folks.)
If you have any questions, feel free to ask! Remember, please be safe when trying this trick!
Monday, February 16, 2009
Giveaway: Custom Applique Wall Monogram!
I love these Wall Monograms so much I can hardly stand it!!!
 I am giving away a single letter applique wall monogram in a letter of your choice!! I will customize the fabric, thread, hoop frame, and ribbon colors! For more photos, check out the listing in my shop.
To enter, please leave a comment below. In case you win, please also let me know the letter and the colors you would like. I will contact the winner for more details before I begin their custom wall monogram.
I will be using a random number generator to choose the winner on Friday, February 27th at approximately 10pm. Please make sure you include a link to your blog or email when you post so I can get a hold of you if you win!
Good Luck!
 I am giving away a single letter applique wall monogram in a letter of your choice!! I will customize the fabric, thread, hoop frame, and ribbon colors! For more photos, check out the listing in my shop.
To enter, please leave a comment below. In case you win, please also let me know the letter and the colors you would like. I will contact the winner for more details before I begin their custom wall monogram.
I will be using a random number generator to choose the winner on Friday, February 27th at approximately 10pm. Please make sure you include a link to your blog or email when you post so I can get a hold of you if you win!
Good Luck!
Subscribe to:
Posts (Atom)


